Aircast Foot Cold Therapy Cryo/Cuff and Cold Therapy Cryo/Cuff Cooler Saver Pack
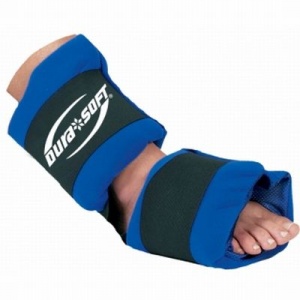
If you're in the process of recovering from a painful foot injury, you might benefit from investing in a cold therapy system. The Aircast Foot Cold Therapy Cryo/Cuff and Cold Therapy Cryo/Cuff Cooler Saver Pack has been specifically designed to provide controlled cold therapy and compression to the foot, and this way reduce swelling and pain felt on the area.
What's Included?
This saver pack includes the following units:
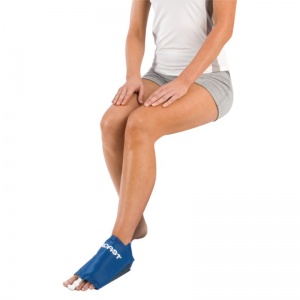
- 1 x Foot Cryo/Cuff
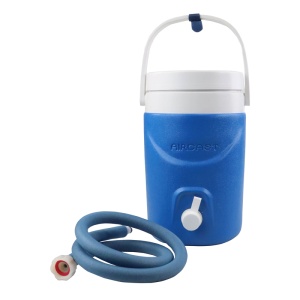
- 1 x Cryo/Cuff Cooler: includes tube assembly and insulation disc
Who Can Use This Pack?
This pack is specially designed for those wanting to relieve symptoms of foot injury such as swelling and pain. The pack, made up of the Aircast Foot Cryo/Cuff and Cryo/Cuff Cooler, uses a combination of compression and cold therapy to target the affected area and ease your discomfort while you recover.
Key Features and Benefits
- Cost-effective way of purchasing the Foot Cryo/Cuff and Cooler
- Provides measured compression for your comfort
- Cooler is detachable for uninterrupted treatment
- Uses a simple, gravity-fed system for ease of use
- Designed with safety and easy application in mind
- Cooler unit delivers chilled water to the foot cuff
- Provides up to eight hours of cryotherapy
What Conditions Will This Pack Help With?
The Cryo/Cuff and Cooler is specially designed to help ease symptoms like pain and discomfort in a number of foot-related injuries. That's why this pack can be used to help treat the following:
- Acute injuries
- Post-operative support
- Rehabilitation
- Soft tissue injuries
- Sporting injuries
- Trauma
What Are the Benefits of Using Cryotherapy to Treat Injury?
Using cryotherapy as a method of treatment for injury can produce a number of benefits. These are:
- Significantly reduces pain and swelling
- Improves blood circulation throughout the affected area
- Reduces inflammation
- Improves joint mobility
Will the Cuff Cover My Whole Foot?
Yes, the cuff is anatomical in design allowing for total coverage of the affected area during treatment. This feature will enable you to gain the maximum amount of cryotherapy possible with each session, so you can get the most out of your treatment.
Gravity-Fed System
The Cold Therapy Cryo/Cuff Cooler is designed to be as easy to use as possible. The device has been crafted so that you can alter the level of compression provided by the cuff simply by adjusting the position of the cooler. When connected to the Cryo/Cuff, the cooler can be raised or lowered to provide the amount of compression of your choosing.
What Size Cuff Should I Choose?
The Aircast Foot Cryo/Cuff is available in two sizes. To find out which cuff size best suits you, measure the circumference of your forefoot (see diagram for guidance) and refer to the table below:
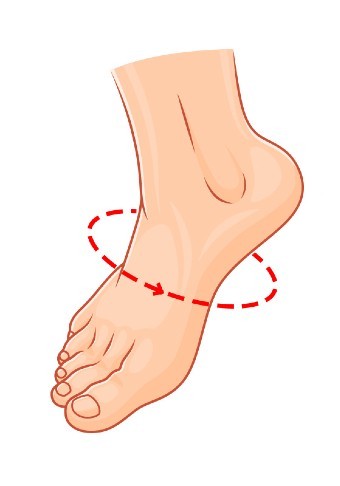
| Size | Foot Circumference |
| Medium | 9 - 13" (23 - 33cm) |
| Large | 13.5 - 17" (25 - 43cm) |
How Do I Use the Cuff?
To understand how to prepare, apply and use the cuff, please follow these four simple steps:
Step One: Prepare the Cooler
Start by connecting the blue tube to the cooler. Fill the cooler to the line with water and add ice to the top. Next, place the insulation disk on top of the ice and close the lid. Allow up to five minutes for the water to cool and shake the cooler occasionally.
Step Two: Apply the Cuff
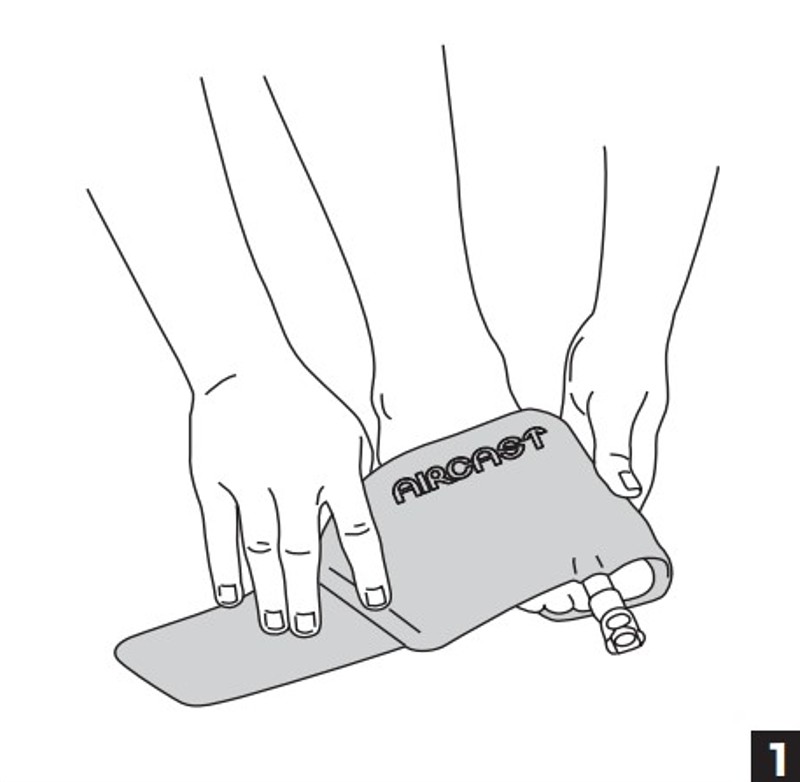
Undo the posterior strap and open the cuff so that it is flat. Position the cuff over the foot with the logo facing upwards and the disconnect valve pointing towards your toes (see figure 1).
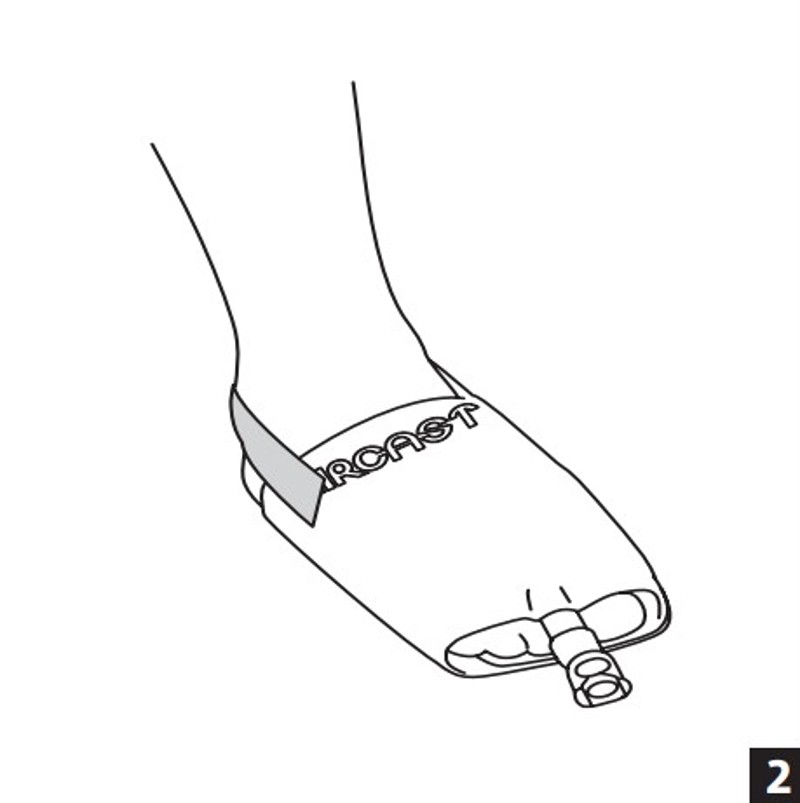
Next, wrap the ends of the cuff under the foot and secure using the straps provided. Finish by wrapping the posterior strap around the back of the heel to secure (see figure 2).
Step Three: Fill the Cuff
To fill the cuff, start by connecting the blue tube to the cuff. Open the air vent located on the top of the cooler lid and raise the cooler no more than fifteen inches above the cuff (see figure 3).
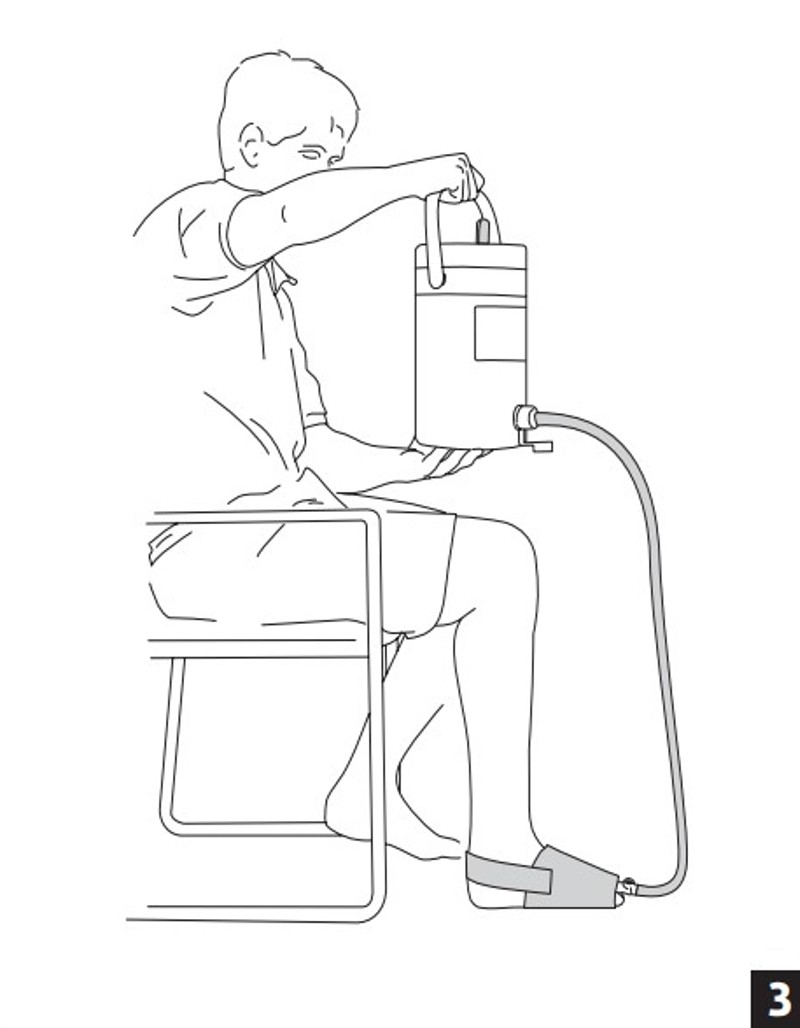
Hold the cooler in this position for about thirty seconds or until the cuff is full. Close the air vent on the cooler lid and disconnect the cuff from the cooler by the pressing the metal tab on the quick disconnect valve.
Step Four: Rechill the Water
To rechill the water, reconnect the blue tube to the cuff and raise the cuff above the cooler. This will allow the water to drain from the cuff back into the cooler. Allow up to two minutes for the water to rechill before repeating the filling process.
For further information about the cuff and its usage, please see the manual below:
How Long Can I Use the Cuff For?
You can use the cuff for up to two hours per session. It is recommended that you wait at least twenty minutes between uses.
Can I Apply the Cuff Directly onto My Skin?
To avoid the risk of skin burn, it is vital that you wrap the skin of the target area with a cloth or bandage before using the cuff.
How Do I Clean the Cuff?
For best cleaning results, simply wash the cuff with soap and hot water before rinsing and leaving to air dry. This process can also be used to clean the blue tube and cooler units also.
Want to Find Out More About the Cuff and Cooler Before You Buy?
To find out more about the cuff, cooler and how to use them, please watch this short video below:
UK Delivery Information & Fees
This item is normally dispatched by Royal Mail. The delivery expectation of this service is 1 to 3 working days.
When ordering before 2.00pm (Monday to Friday), your item will usually be dispatched the same working day.
We offer free delivery on all orders of £40.00 and over. On orders below £40.00, a £3.95 delivery charge is applied.
| Order Value | Delivery Fee | Delivery Timescale |
| Up to £39.99 | £3.95 | 1 to 3 working days |
| £40.00 and over | FREE | 1 to 3 working days |
Please see our specific delivery information page for more information. For up to the minute delivery information, please call our customer care team on 020 7501 1102 who will be happy to help.
This item CAN NOT BE RETURNED - on grounds of hygiene
Shoe Insoles is dedicated to maintaining the highest levels of hygiene for all its products, and for this reason this item is non-refundable and non-returnable if unsuitable or unwanted, on grounds of hygiene.
If you have any questions regarding this returns policy, please contact our customer care team on 020 7501 1102 for further details.
Our Guide to Finding the Perfect Size and Fit
Using Your Shoe Size
For most of our insoles, the easiest way to find the best size for you is to go off of your current shoe size. The majority of our insoles are available in a range of sizes and you can simply select the size that best fits your existing shoes.
Please be aware that, as with shoes, there can be slight variations in the size of insoles. For example a size 8 of one brand might not be exactly the same size and width as the size 8 of another. To help account for these discrepancies, a number of our insoles include dimensions to help you ensure you're getting the right size.
Measuring Your Current Insoles
While using your shoe size to find your best size is a good guide, it is not always foolproof. If you want to guarantee that your insole fit your shoes as closely as possible, we recommend measuring your existing insole and using this as a guide to your size.
To do this, please follow the steps outlined below:
- Remove the existing insole from the shoes you wish to use your new insoles with (please note that not all insoles are removable)
- Measure the insoles at their longest and widest points (see the below diagram for an idea of where this will be
- Match the measurements to the dimensions of the insoles listed, and choose the size that best fits your results
.jpg)

Where Can I Find the Dimensions?
The dimensions for insoles can be found on the "Product Details" tab (please see below) and are usually found in the sizing section of the listing, in a table. Please be aware that not all products currently have the dimensions listed.

The dimensions of insoles can usually be found on the "Product Details" tab
What If There Are No Dimensions Listed?
If you do not see the dimensions listed on the Product Details tab, please fill in the form below and we will work to get the relevant information as quickly as possible. We will email you once we have the information that you have requested.
Trimming Your Insoles to Fit
To get the ultimate level of fit from your insoles, you can trim them to make a small adjustment. To trim your insoles, simply follow the steps below:
- Remove your existing insoles from your shoes
- Line up your existing and new insoles at the heel
- Trace the outline of the insoles against the new pair at the toe end (see the image below for an example)
- Carefully cut along the traced line
- Your insoles should now fit your shoes better
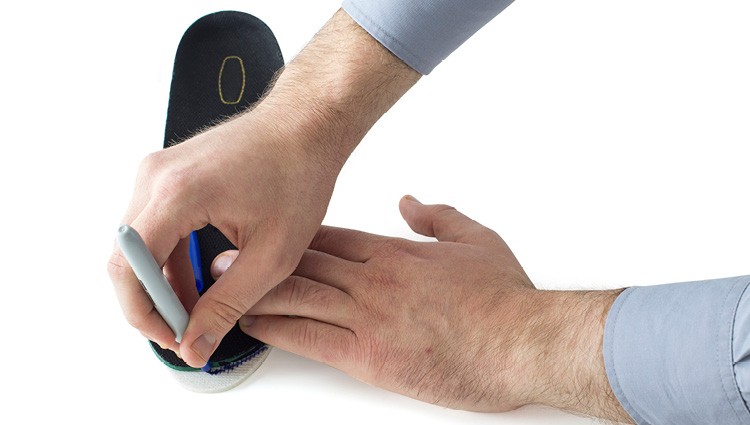
Carefully trace the outline of your insole
Please note that not all insoles are suitable for trimming. Most insoles are unsuitable for return once they have been trimmed to fit; we recommend bearing this in mind prior to trimming.
If you would like a more detailed guide to trimming your insoles, please read our full guide on How to Trim Your Insoles.


.jpg)
.jpg)
.jpg)
.jpg)
.jpg)
.jpg)
.jpg)
.jpg)
.jpg)
.jpg)
.jpg)
.jpg)