Langer Bio Unified Low Density Orthotic Pronation Insoles
The Langer Bio Low Density Orthotic Pronation Insoles are specially designed for users requiring intensive support for pronation. Its customisable design with self-adhesive components allow for modification of the insoles to reduce pronation (including those with a large amount of pronation and a medial STJ axis requiring a MOSI), and encourage first ray propulsion in the feet.
Please Note: This product is intended to be issued by a medical professional or a podiatrist.
What's Included?
- 2 x 3/4 Length Insole Shells
- 2 x Full-Length EVA Top Covers
- 2 x 2° Rearfoot Wedges
- 2 x 4° Rearfoot Wedges
- 2 x 6° Rearfoot Wedges
- 2 x 5mm Heel Lifts
Which Size Is Right For Me?
Langer Bio Unified Insoles are available in five sizes that should suit most adults. To find your perfect size, simply match your shoe size to the table below.

| Size | UK Shoe Size | Dimensions (Length x Width) |
| Extra Small | Size 3 - 4.5 | 245 x 78mm |
| Small | Size 5 - 6.5 | 260 x 85mm |
| Medium | Size 7 - 8.5 | 275 x 89mm |
| Large | Size 9 - 10.5 | 295 x 96mm |
| Extra Large | Size 11 - 12.5 | 310 x 100mm |
Key Features and Benefits
- Comfortable orthotic insoles treat over-pronation and supination
- Customisable design for tailored cushioning and support
- High-quality heat-mouldable polypropylene shells allow for instant shell shape modification
- Slender, flexible, and strong for excellent biomechanical control
- Self-adhesive components allow for quick modifications
- High-quality EVA top covers with an anti-microbial fibre cover
- Low bulk, easy-to-use and modify functional design
- Designed with UK MSK podiatrist Paul Harradine
- Also available in a high density version for users with high supination resistance
Customisable Cushioning and Support Insoles
The Bio Unified Insoles are specially designed to help reduce over-pronation and under-pronation, encourage first ray propulsion, and be comfortable to wear. The insoles come with free components for modification and are heat-mouldable allowing the user to have tailored cushioning and support for the feet.
What Is First Ray Propulsion?
The first ray is a segment in the foot consisting of the first metatarsal and first cuneiform bones. First ray propulsion refers to lifting/pushing action of the segment when moving forward. Satisfactory first ray propulsion comes with a normal gait, and two ways to achieve it is by reducing pronation and/or permitting first ray plantar flexion, as will be explained below.
First Ray Groove
To permit first ray plantar flexion, the Bio Unified Insoles feature 3/4 shells with a first ray groove design. The first ray groove in the shell of the appliance decreases the dorsiflexion moments on the first ray while maintaining a comfortable almost full-width appliance.
How Do the Insoles Reduce Pronation in Users?
When wearing the Bio Unified Insoles, reducing pronation is achieved by a force medial to the STJA. A MOSI modification can be added into the heel cup of the shell for those very pronated patients with a medial deviated STJ axis. Alternatively, a more traditional hemi post or total rearfoot post may be applied, or even a heel raise. Conversely, lateral posting to encourage pronation in the rare supinators can also be added.
What Does Each Component Do?
- 3/4 Polypropylene Shells: These are heat-mouldable, changing its shape to provide the user with a more tailored comfortable fit of the insoles.
- 2°, 4°, 5° Degree Rearfoot Wedges: These are primarily used to change the timing of the pronatory phase and control any excessive pronation. These wedges are place at the heel area of the orthotic and the Langer Bio Insoles incorporate a guide to ensure correct placement.
- 5mm Heel Lifts: These are used to reduce stress on the Achilles tendon, equinus structures and, on the rare occasion, treat limb length discrepancies. Heel lifts are placed at the heel area of the orthotic and the Langer Bio Insoles incorporate a guide to ensure correct placement.
Heat-Mouldable for A Customised Comfortable Fit
Many users with pronation have foot arch contours that don't fit the pre-fabricated shell of some insoles. To counteract this the Bio Unified Orthotic Insoles use heat-mouldable polypropylene for their shells meaning they change shape with localised heating to provide the user with a comfortable and non-irritating fit on their feet. Heating of the shells can be achieved for example with the use of a heat gun to instantly modify its shape.
Who Are These Langer Orthotics For?
Users who have the following conditions will especially benefit the most from wearing the Langer Bio Unified Medical Insoles:
- Pronation related symptoms/gait dysfunction, even those with a large amount of pronation and a medial STJ axis requiring a MOSI
- Supination related symptoms/gait dysfunction
- Functional limitation of the 1st MTPJ due to either pronation and/or dorsiflexion of the first ray
Please Note: This product is intended to be issued by a medical professional or a podiatrist.
Who Shouldn't Use the Insoles?
Users who should not use the Bio Unified Medical Insoles include:
- Stage 2 and above structural hallux limitus. Encouraging the use of the 1st MTPJ in these patients may worsen symptoms
- Pressure related injury or lesion sub the 1st MTPJ. E.g. ulcers sub the 1st MTPJ
- Those with possible adverse effects to improved use of the 1st MTPJ in gait, e.g. those with painful limitation to hip extension such a labral tears may extend their hip further in gait with improved 1st MTPJ function
What's the Difference Between the Low Density and High Density Version Of These Insoles?
The Langer Bio Unified Orthotic Insoles come in two versions - high density and low density. The insole the user needs will depend on their supination resistance which can be tested by following the instructions below:
Ask your patient to stand in a normal weight bearing position with their feet firmly on the ground. Using two fingers, try to lift (supinate) their foot under the medial navicular and assess how easy/hard it is.
- High Supination resistance = High density shell and great medial wedging
- Low Supination resistance = Low density shell and less medial wedging
UK Delivery Information & Fees
This item is normally dispatched by Royal Mail. The delivery expectation of this service is 1 to 3 working days.
When ordering before 2.00pm (Monday to Friday), your item will usually be dispatched the same working day.
We offer free delivery on all orders of £40.00 and over. On orders below £40.00, a £3.95 delivery charge is applied.
| Order Value | Delivery Fee | Delivery Timescale |
| Up to £39.99 | £3.95 | 1 to 3 working days |
| £40.00 and over | FREE | 1 to 3 working days |
Please see our specific delivery information page for more information. For up to the minute delivery information, please call our customer care team on 020 7501 1102 who will be happy to help.
Our Guide to Finding the Perfect Size and Fit
Using Your Shoe Size
For most of our insoles, the easiest way to find the best size for you is to go off of your current shoe size. The majority of our insoles are available in a range of sizes and you can simply select the size that best fits your existing shoes.
Please be aware that, as with shoes, there can be slight variations in the size of insoles. For example a size 8 of one brand might not be exactly the same size and width as the size 8 of another. To help account for these discrepancies, a number of our insoles include dimensions to help you ensure you're getting the right size.
Measuring Your Current Insoles
While using your shoe size to find your best size is a good guide, it is not always foolproof. If you want to guarantee that your insole fit your shoes as closely as possible, we recommend measuring your existing insole and using this as a guide to your size.
To do this, please follow the steps outlined below:
- Remove the existing insole from the shoes you wish to use your new insoles with (please note that not all insoles are removable)
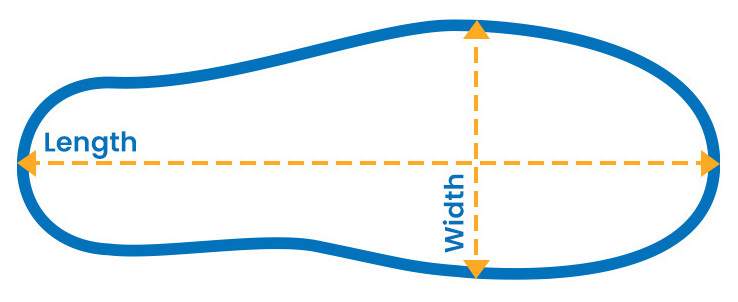
- Measure the insoles at their longest and widest points (see the below diagram for an idea of where this will be
- Match the measurements to the dimensions of the insoles listed, and choose the size that best fits your results
.jpg)

Where Can I Find the Dimensions?
The dimensions for insoles can be found on the "Product Details" tab (please see below) and are usually found in the sizing section of the listing, in a table. Please be aware that not all products currently have the dimensions listed.

The dimensions of insoles can usually be found on the "Product Details" tab
What If There Are No Dimensions Listed?
If you do not see the dimensions listed on the Product Details tab, please fill in the form below and we will work to get the relevant information as quickly as possible. We will email you once we have the information that you have requested.
Trimming Your Insoles to Fit
To get the ultimate level of fit from your insoles, you can trim them to make a small adjustment. To trim your insoles, simply follow the steps below:
- Remove your existing insoles from your shoes
- Line up your existing and new insoles at the heel
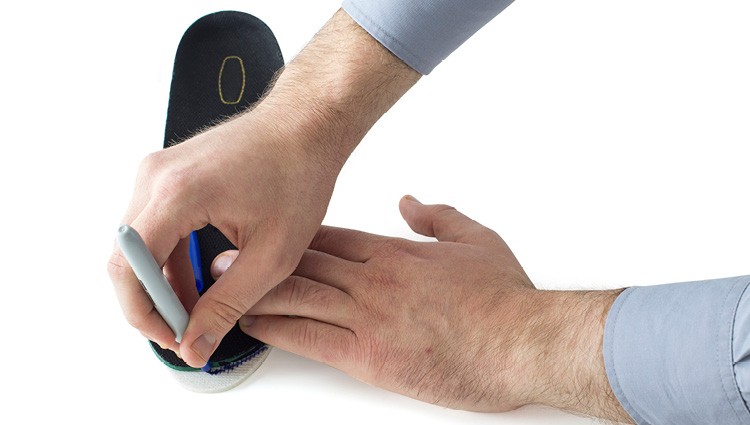
- Trace the outline of the insoles against the new pair at the toe end (see the image below for an example)
- Carefully cut along the traced line
- Your insoles should now fit your shoes better

Carefully trace the outline of your insole
Please note that not all insoles are suitable for trimming. Most insoles are unsuitable for return once they have been trimmed to fit; we recommend bearing this in mind prior to trimming.
If you would like a more detailed guide to trimming your insoles, please read our full guide on How to Trim Your Insoles.


.jpg)
(1).jpg)
(2).jpg)